By
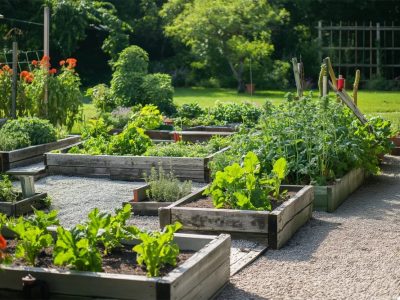
By Raised bed gardening offers a multitude of benefits for backyard growers, from superior soil drainage and fewer weeds to an easier working height that spares your back and knees. While commercial planter kits can be expensive and frustrating to assemble, building your own custom wooden raised bed is a surprisingly straightforward weekend project.
By streamlining your design and gathering all necessary materials in advance, you can easily build a durable, functional, and visually appealing raised garden bed in less than two hours. This comprehensive guide walks you through selecting the right site, gathering materials, and assembling the structure efficiently.
Planning and Material Selection
The key to finishing this project within a tight two-hour window lies in keeping the blueprint simple. A classic four-by-eight-foot rectangle is the gold standard for backyard gardening. This dimension allows you to comfortably reach the center of the bed from either long side without stepping inside and compacting the soil.
Choosing the Right Lumber
Selecting the correct type of wood dictates how long your garden bed will withstand the elements and soil moisture.
-
Cedar and Redwood: These are the premier choices for outdoor woodworking. They contain natural oils and tannins that make them highly resistant to rot, decay, and boring insects. While more expensive upfront, cedar and redwood structures can easily last a decade or longer without any chemical treatments.
-
Untreated Douglas Fir or Pine: If you are working on a budget, untreated thick fir or pine planks are acceptable alternatives. They will eventually succumb to moisture, but you can typically expect five or more years of solid use before needing to replace the boards.
-
A Note on Pressure-Treated Wood: Modern pressure-treated wood is generally considered safe for food crops, as the industry shifted away from using arsenic-based preservatives. However, many organic gardeners still prefer to use naturally rot-resistant woods or line the interior of treated frames to eliminate any worry about chemical leaching.
To make this build incredibly fast, opt for thicker two-by-twelve lumber planks. Using a single twelve-inch wide board per side eliminates the extra step of stacking and securing multiple narrower boards to achieve the necessary soil depth.
Tools and Materials Checklist
Before starting your timer, make sure you have every item on this list gathered right at your workspace. Hunting for a misplaced tool mid-build is the fastest way to blow past your two-hour goal.
Required Materials
-
Two pieces of 2×12 lumber cut to 8 feet (for the long sides)
-
Two pieces of 2×12 lumber cut to 4 feet (for the short sides)
-
One piece of 4×4 lumber cut into four 12-inch lengths (for the structural corner posts)
-
One box of 3-inch exterior-grade deck screws (look for ceramic-coated or stainless steel options to prevent rust)
-
A roll of heavy-duty hardware cloth or galvanized wire mesh (to deter burrowing pests)
-
A roll of permeable landscape fabric or thick cardboard (to smother underlying grass)
Required Tools
-
Cordless drill and driver bits
-
Countersink drill bit (prevents the wood from splitting near the edges)
-
Speed square or combination square (to ensure perfectly crisp 90-degree corners)
-
Tape measure and pencil
-
Safety glasses and work gloves
-
Staple gun and heavy-duty staples
-
Level (a 2-foot or 4-foot model works best)
Step-by-Step Assembly Instructions
With your materials prepped and your tools close at hand, you are ready to begin assembling the structure. Follow these structured steps to ensure structural integrity and efficiency.
Frequently Asked Questions
Can a raised garden bed be placed directly on a concrete patio or asphalt driveway?
Yes, you can build and place a raised bed on concrete or asphalt, but you must make a few adjustments for drainage and soil retention. Since water cannot drain directly into the ground, you should use a slightly deeper bed, ideally fifteen to eighteen inches, to give roots ample room. Line the bottom with a layer of landscape fabric to prevent the soil mixture from washing out across your patio every time you water. Keep in mind that concrete can absorb and radiate heat, so beds placed on hardscapes may dry out faster during hot summer months and require more frequent irrigation.
What is the best soil mixture formulation to fill a newly constructed raised bed?
Do not fill your raised bed with ordinary native topsoil from your yard, as it is often too dense, prone to compaction, and packed with dormant weed seeds. Instead, use a classic customized blend often called a modified square foot gardening mix. Combine equal parts of high-quality organic compost, coarse vermiculite or perlite for aeration, and peat moss or coconut coir for moisture retention. This creates a lightweight, nutrient-rich medium that allows plant roots to breathe and expand effortlessly.
How do you prevent the long sides of an eight-foot bed from bowing outward over time?
While a twelve-inch deep bed experiences less lateral pressure than ultra-tall beds, damp soil is incredibly heavy and can cause long planks to bow slightly over several seasons. To prevent this, you can drive a sturdy wooden stake or a piece of steel rebar into the ground directly outside the exact center point of each eight-foot plank. Alternatively, run a scrap piece of lumber across the middle interior of the bed, screwing it into both long walls to act as a tension tie that locks the sides together.
Is it necessary to seal or stain the exterior of a DIY wooden raised bed?
Sealing is optional and depends on the aesthetics you prefer and the type of wood used. If you used premium cedar or redwood, leaving the wood raw is perfectly fine because it will naturally weather to a beautiful silvery-gray patina without losing structural strength. If you choose to stain or seal pine or fir to prolong its lifespan, ensure you select a non-toxic, eco-friendly, water-based product clearly labeled safe for vegetable gardens to avoid introducing synthetic VOCs into your growing environment.
How do you handle sloping ground when installing a quick two-hour raised bed?
If your chosen garden site has a minor slope, the absolute fastest solution is to trench out the uphill side. Rather than attempting to build a complex terraced or stepped frame, dig a narrow channel into the high ground so the uphill board can sit lower in the earth. This allows the top edge of the entire bed to remain completely level. Make sure the wood buried in the trench is rated for ground contact to prevent premature rotting.
What is the purpose of adding cardboard to the bottom of the bed instead of plastic?
Plastic sheeting should never be used at the bottom of a raised garden bed because it creates an impermeable barrier that traps water, leading to stagnant, waterlogged conditions and root rot. Cardboard is ideal because it temporarily smothers the existing grass and weeds to prevent them from growing up into your new soil layer. Over the course of the first growing season, the cardboard will naturally break down, allowing earthworms and deep vegetable roots to move freely between the raised bed and the natural earth below.