 By
By One of the most frequent errors in sod installation is neglecting to prepare the soil adequately. Proper soil preparation is crucial for the sod to take root and thrive. Before laying the sod, the soil must be loosened and free of debris. Compact soil can impede root growth and lead to poor sod performance. A thorough tilling can help to break up compacted soil, improving aeration and water absorption. Additionally, incorporating organic matter, such as compost, can enhance soil fertility and structure, providing a better environment for the new sod.
Soil testing is another critical step that is often overlooked. Testing the soil for nutrient levels and pH balance can guide you in making necessary amendments before sod installation. For instance, if the soil is too acidic or lacks essential nutrients, the sod may struggle to establish itself. Adjusting the soil’s pH and nutrient levels according to the test results can significantly improve the chances of successful sod installation in Arlington, TX.
Finally, leveling the soil is essential. Uneven surfaces can cause water to pool in low areas, leading to overwatering in some spots and drought stress in others. A smooth, even surface ensures that the sod receives consistent moisture and nutrients, promoting uniform growth. Proper grading also helps prevent drainage issues, which can be particularly problematic in regions with heavy rainfall.
Laying Sod Incorrectly
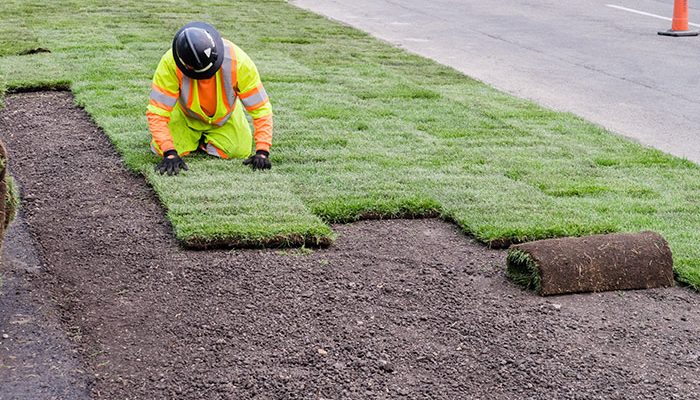
Improper sod laying techniques can result in poor establishment and uneven growth. One common mistake is not staggering the sod seams. Laying sod in a straight line can create long seams that are prone to drying out and separating. Instead, lay the sod in a brick-like pattern to minimize the length of seams and improve overall sod cohesion. This method helps the sod pieces knit together more quickly, forming a seamless lawn.
Another frequent error is failing to butt the edges of the sod pieces tightly together. Gaps between sod pieces can allow weeds to grow and can dry out the soil beneath, hindering sod establishment. Ensure that each piece of sod is pressed firmly against its neighbor without overlapping. Overlapping can create uneven surfaces and hinder root contact with the soil.
Rolling the sod after installation is another crucial step that is often skipped. Rolling helps to eliminate air pockets between the sod and the soil, ensuring good root-to-soil contact. This step is particularly important for ensuring that the sod roots properly and establishes a strong connection with the soil beneath. Use a lawn roller filled with water to gently press the sod into the soil without damaging the new grass.
Ignoring Watering Needs
Watering is a critical factor in the success of sod installation. One common mistake is not watering the sod immediately after installation. New sod requires a significant amount of water to start the rooting process. It is essential to water the sod thoroughly within the first hour of installation to ensure that the roots begin to establish in the soil.
Overwatering or underwatering are also common mistakes. New sod needs to be kept consistently moist but not waterlogged. Overwatering can lead to root rot and other fungal diseases, while underwatering can cause the sod to dry out and die. It’s important to follow a proper watering schedule, which typically involves watering the sod lightly several times a day for the first couple of weeks, gradually reducing the frequency as the sod establishes.
Timing is another critical aspect. Early morning or late evening watering is best to minimize evaporation and ensure that the water penetrates deeply into the soil. Avoid watering during the hottest part of the day, as this can lead to excessive evaporation and poor water absorption.
Failing to Consider Soil Compaction
Soil compaction is a common issue that can severely impact the success of sod installation. Compacted soil restricts root growth and limits the soil’s ability to absorb water and nutrients. Before installing sod, it is crucial to address soil compaction by aerating the soil. Aeration involves creating small holes in the soil to allow air, water, and nutrients to penetrate more deeply. This process helps to alleviate compaction and promotes healthier root growth.
Using a lawn roller filled with water can help to compact the soil slightly after aeration, creating a firm but not overly compacted surface for the sod to establish. It is essential to strike a balance, as too much compaction can hinder root penetration, while too little can lead to poor sod contact with the soil.
In some cases, it may be necessary to bring in additional topsoil to improve soil quality and alleviate compaction issues. High-quality topsoil can provide a better growing medium for the new sod, ensuring that it has the nutrients and structure needed to thrive. However, it is important to blend the new topsoil with the existing soil to prevent layering, which can create drainage problems.
Overlooking the Importance of Fertilization
Fertilization plays a critical role in the establishment and growth of new sod. One common mistake is not fertilizing the soil before laying the sod. Applying a starter fertilizer can provide the new sod with essential nutrients that promote root growth and establishment. Choose a fertilizer with a balanced nutrient profile, including nitrogen, phosphorus, and potassium, to support the sod during its initial growth phase.
Applying too much or too little fertilizer can also be problematic. Over-fertilization can lead to nutrient burn, while under-fertilization can result in poor sod establishment and growth. Follow the recommended application rates on the fertilizer packaging, and consider performing a soil test to determine the specific nutrient needs of your soil.
Post-installation fertilization is equally important. Once the sod has started to establish, applying a slow-release fertilizer can help maintain healthy growth and development. It is essential to follow a regular fertilization schedule to ensure that the sod receives the nutrients it needs throughout the growing season.
Neglecting Post-Installation Care
Proper post-installation care is crucial for the long-term success of your sod installation in Arlington, TX. One common mistake is not mowing the sod at the appropriate time. It is essential to wait until the sod has established a strong root system before mowing. Typically, this means waiting until the sod has grown to a height of 3 to 4 inches. Use a sharp mower blade and avoid cutting more than one-third of the grass height at a time to prevent stress on the new sod.
Weed control is another important aspect of post-installation care. Weeds can compete with the new sod for water, nutrients, and sunlight, hindering its establishment. Regular monitoring and prompt removal of weeds can help ensure that the sod remains healthy and vigorous. Applying a pre-emergent herbicide can also help prevent weed seeds from germinating and taking hold in the new sod.
Finally, it is important to monitor the sod for signs of pests and diseases. New sod can be vulnerable to various pests and diseases, which can quickly spread and cause significant damage. Regular inspection and prompt treatment of any issues can help protect your investment and ensure the long-term health of your lawn.
Underestimating the Importance of Timing
Timing is a critical factor in the success of sod installation. One common mistake is installing sod during the wrong season. In Arlington, TX, the best time to install sod is during the cooler months of the year, such as early spring or fall. Installing sod during the peak of summer can be challenging due to high temperatures and increased water requirements.
It is also important to consider the weather forecast before installing sod. Avoid installing sod during periods of heavy rain, as this can lead to waterlogged soil and poor sod establishment. Similarly, extreme heat can increase the risk of sod drying out and failing to root properly.
Planning the installation process and allowing adequate time for soil preparation, sod laying, and post-installation care is essential. Rushing the process or skipping steps can lead to poor results and increased maintenance requirements in the future.
Ignoring Sod Quality
The quality of the sod itself is a crucial factor in the success of your lawn. One common mistake is purchasing low-quality sod that is thin, weak, or contains a high percentage of weeds. High-quality sod should be thick, healthy, and free of weeds and pests. It is important to source sod from reputable suppliers who can provide certification of the sod’s quality and origin.
Inspecting the sod before purchase is also important. Look for signs of disease, pest infestation, or poor health. The sod should be green, moist, and have a well-developed root system. Avoid sod that appears dry, yellow, or has a significant amount of thatch.
Proper handling and transportation of the sod are also critical. Sod should be installed as soon as possible after delivery to prevent it from drying out and becoming damaged. Keep the sod moist and shaded if there are any delays in installation.
By avoiding these common mistakes and following best practices for sod installation, you can ensure a healthy, lush lawn that enhances the beauty and value of your property in Arlington, TX. Proper preparation, installation, and post-installation care are key to achieving a successful sod installation that will thrive for years to come.